5 Easy Yoga Postures for Reducing Stress and Anxiety
The efficacy of yoga in our body and mind has already been proven, and many people today are turning to yoga in the hope of improving the quality of their lives.
Stress and anxiety contaminate the health and quality of life more than any other factor. Stress has been likened to a ticking time bomb of slow movement, which can cause conditions that affect the quality of life, such as diabetes, blood pressure and heart disease in a perfectly healthy body, in a short space of time.
The good news is that stress can be controlled and gradually eradicated by our own will, since yoga works great calming the mind; therefore, it helps reduce stress and anxiety.
Here are 5 yoga poses that have been shown to help reduce and prevent stress:
If you are just starting out with yoga, beginning first with the basic breathing exercises. Pranayama or yoga breathing to yuda get the bad air of the body, while re-fill the lungs with fresh air and nerves. Ideally, you should do it early in the morning or after 3 or 4 hours of a meal.
1. Kapalabhati Pranayama
Clarifies the mind and promotes concentration and inner calm. Not surprisingly, Kapala means “front” and bhati “light”.
It is also known as Energizer breathing or Purifying and is also one of the purification exercises that cleans the airways of mucus and impurities and stimulates the metabolism by raising the body heat.
Kapalabhati breathing technique is characterized by a deep breath with the abdomen relaxed and a forced exhalation where the abdominal muscles contract actively and rapidly pushing the diaphragm into the lungs.
Thus the lungs, like bellows, get more rarefied air and expel carbon dioxide. In addition, the constant movement of ascent and descent of the diaphragm act in stimulating the stomach, liver and pancreas.
Kapalabhati Pranayama Step by Step:
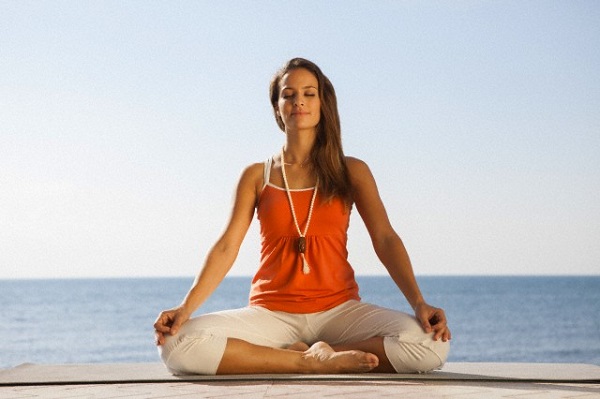
- Sit in comfortable cross-legged position with your back straight. Hands resting on your knees in mudra and relaxed face. Immediately relax the entire abdomen to begin inhaling naturally and passively.
- Inhale deeply through the nostrils, expanding the abdomen. And exhale with a strong contraction of the abdominal muscles. (The exhalation is also done through the nose). The air is pushed out of the lungs by contraction of the diaphragm.
- After each exhalation make a new inhalation. The inhalation should not involve any effort. To inhale just relax and expand automatic lungs filling with air. You can start with 10 breaths (10 inhalations and 10 exhalations)
After completing 10 quick exhalations and 10 natural breaths. Inhale and exhale deeply once or 2 times.This is one round. You can start practicing Pranayama Kapalbhati with 3 of those practice rounds.
You may also like to read another article on AnxietyReduction: Anxiety is an emotional disorder that always heals.
Important point to remember:
- Exercise should not be done if you feel uncomfortable at any time during execution.
- Kapalbhati should be practiced on an empty stomach.
- practice after asanas and relaxation (at least 10 minutes) before meditation is recommended.
Precautions:
Kapalbhati should not be performed in these cases:
- Persons suffering from heart disease.
- High blood pressure.
- Patients with hernia
- There should never be practiced during an asthma attack in progress.
- If you experience pain or dizziness, it is preferable to end the practice until the feeling passed. The practice can be restarted with less force.
- The rapid exhalation should be comfortable for oneself, that is should not be too overwhelming.
2. Balasana or Child Pose
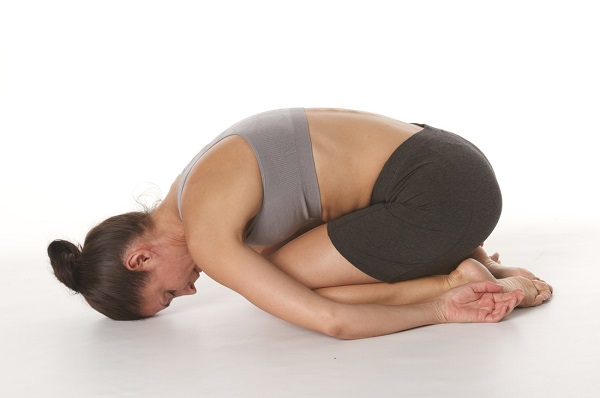
Also it is known as the child’s pose. Balasana works by shifting its focus toward the sound of your breathing and also reduces back and neck pain through stretching.
This position involves, basically, sitting with your head down, so you would do this on a comfortable surface.
– Sit on the floor and knees comfortably apart.
– Lean on your heels, with toes touching the feet and stretch your arms backwards, palms up, and head down to the ground.
– And your arms and hands down at your sides and lie stretched out in front or touching the ground.
Hold this position for 30 seconds or until you feel comfortable.
3. Uttanasana
You may have made forward lean before, where you try to keep your knees straight and bend forward to touch your toes.
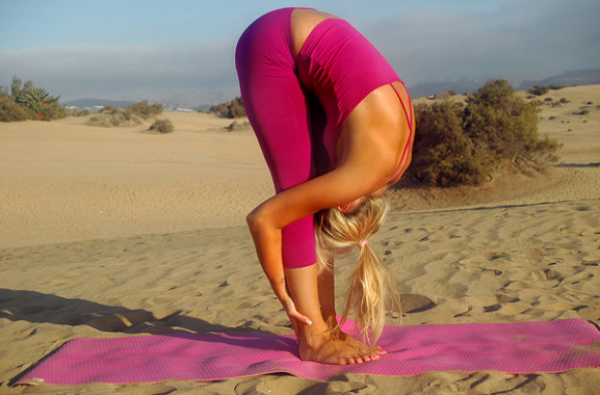
Uttanasana is a modified version of it, where you can bend your knees, touch the floor and bring your head as close as possible to the knees.
Uttanasana Footsteps:
– Inhale and extend your arms above your head. Exhale, bend forward, shrinks the stomach and imagining that your hip acts as a hinge, bend forward keeping completely, if possible, back and legs straight.
– Place your hands to the sides of the feet keeping all fingers straight. He directs the head to the feet. Put very strong quadriceps will help to stretch my legs. If need hamstrings, bend your knees slightly.
– With each inhalation in the pose, lift and lengthen the torso slightly forward, with each exhale lean further forward.
– In this way the torso oscillates almost imperceptibly with the breath. Let your head hang from the root of the neck. Stay in the pose for 30 seconds to 1 minute. With inhalation you lift your torso slowly, placing vertebra by vertebra.
You may also like to read another article on AnxietyReduction: Keys to overcome anxiety.
Contraindications:
If there are back injuries he was cautiously enter the position with legs bent. Similarly if the hamstrings are tight, bend your knees slightly to help release the column. People with low blood pressure should leave this position very slowly as they can get dizzy.
4. Push back or backbends
This asana is best done if you have an exercise ball, providing greater control and support.
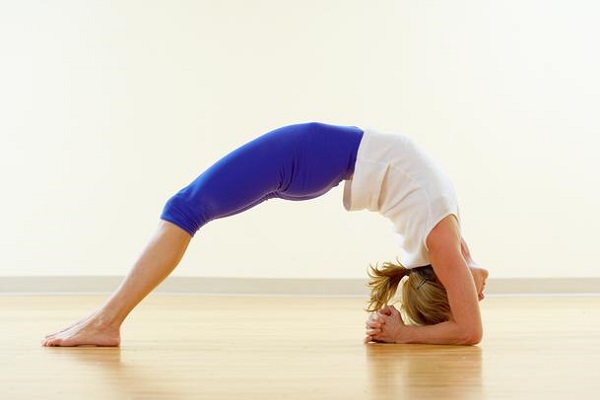
As the name suggests, lie on your back on the ball and try to touch the floor with the palms of their outstretched hands.
Some experienced yogis can do without the ball, but if you’re a beginner you might want to avoid this at the moment.
The exercise ball is acquired in gyms and the right size is checked by sitting on the ball and making sure your hips and knees are at right angles to the floor.
Since backbends can sometime feel too intense, using an exercise ball as support can help you learn the position.
The push-back helps in stretching the chest and also makes the blood flow to the brain. This is ideal to refresh your mind and increase blood flow, which reduces stress. Making a series of push back above the pranayama the effect of breathing exercise will double.
You may also like to read another article on AnxietyReduction: How to combat anxiety with 10 practical strategies.
Push-back or bakbends Footsteps:
- Begin sitting on the ball, with comfortable spine and stretched. Use the feet to help maintain balance.
- Slowly feet forward a few feet, and lie your back on the ball, feeling the soft padding air support the natural curve of the spine.
- Keep your arms at the sides of the ball, or straightens your arms over your head to the ground.
- Push yourself on your feet and lands the palms. You are now completely in a bending backwards, also called Dhanurasana Urdhva wheel or Sanskrit.
- Stay well for as long as you wish, breathing deeply and allowing the spine to lengthen.
- To reverse the position, make pressure slowly in your hands, change the weight to your feet and lift your torso to return to the sitting position on the ball.
5. Viparita Karani
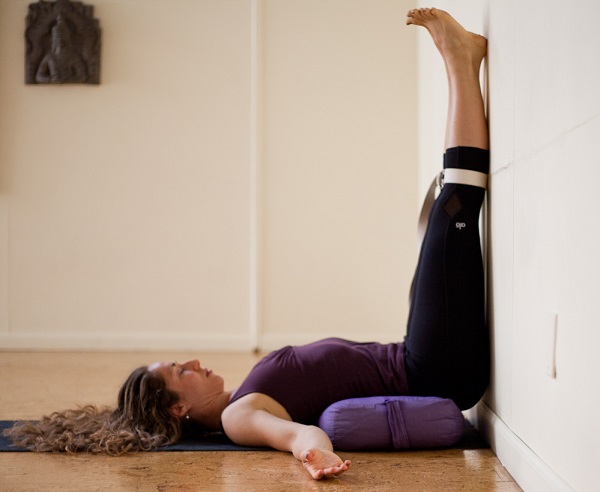
This is a simplified version of the headstand. Sit on the pillow next to the wall; slowly lie down with your legs up the wall so that the entire lower body is pressed against it. And the pillow is positioned between the hips and lower back.
Now try to relax your body and breathe slowly, counting each breath you take.
If you have proved useful and interesting this article, let me thank you comment and share it with your friends on social networks.

